
Tools needed:
- Nut driver, 1/4" or 5/16". You'll probably need one specially made for guitar truss rods. Purchasing info is at the end of this article.
- Metal ruler or straight edge, 20-25" long
- Small ruler with 1/16" increments
- Put on new strings. String action (height), fret buzz and intonation will vary with different string gauges and from old to new strings. You want to do your setup under actual playing conditions, so string your guitar with the gauge of strings that you're going to play. If you're replacing strings on a new Gibson, most solidbody electrics (Les Pauls, ES-335s, Nighthawks, Flying V's, SG's) come from the factory with light gauge strings, beginning with .009. The Chet Atkins SSTs and hollowbody electrics (ES-175) come with .010s. Most flat tops are strung at the factory with medium gauge, beginning with .013.
- Again, your guitar needs to be in playing condition, so tune up to standard pitch (or whatever tuning you'll be using).
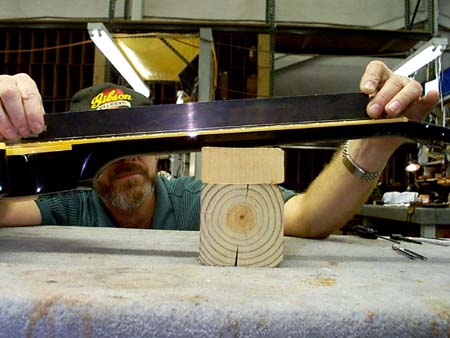
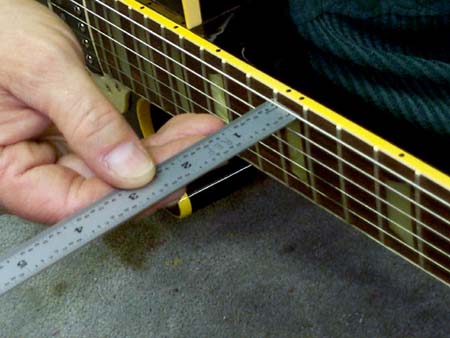
Check the straightness of the neck. Use a straight edge to determine if a truss rod adjustment is needed. If the neck is bowed, there will be a space under the middle of the straight edge where the neck does not touch the straight edge. If the neck is "backbowed," the frets will touch in the middle of the straight edge.
NOTE: A slightly bowed neck is ideal for most playing styles. A perfectly straight neck generally requires higher string action than a slightly bowed neck in order to minimize string buzz at the higher frets. Repairmen describe this as giving the neck some "relief" to allow for string vibration. The amount of relief necessary varies with playing styles, however. A perfectly straight neck may be fine for a very light picking style. If your neck has only a slight bow, you may not want to make any adjustments to the truss rod.
I like to start with a perfectly straight neck. If I can't get the neck straight, then that indicates other possible problems, such as high frets (frets being pushed out of their slots), low or worn frets, or variations in the fretboard itself, Many older guitars have a "bump" in the fingerboard over the neck block, for example. All of these problems are fixable, but require an advanced level of repair experience.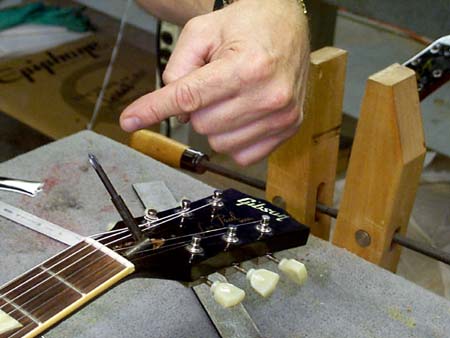
Adjust the truss rod (if necessary). First remove the truss rod cover. If the neck has too much of a bow, then the truss rod should be tightened with a clockwise turn of the nut. For a clockwise turn, the arm of the nut driver should start on the treble side of the fingerboard and move toward the bass side. Don't turn the nut more than a quarter of a turn at a time. For a backbowed neck, the truss rod should be loosened with a counterclockwise turn of the nut. When the neck is as straight as you can get it, then back off about a quarter of a turn for "relief."

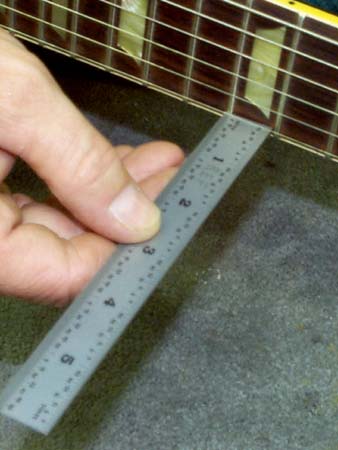
- Check string height. With the small ruler on top of the
fret, measure the distance to the bottom of the string. (You can also
use a feeler gauge for these measurments.)
The string height at the 1st fret will determine if the nut slots have been cut to the proper depth. If the nut slots need to be deepened or filled in, that's a job for a pro with the proper tools.
The string height at the 12th fret will determine whether the saddle should be raised or lowered.
Gibson electric specifications are:- 1st fret- treble side - 1/64"
- 1st fret- bass side - 2/64"
- 12th fret- treble side - 3/64"
- 12th fret - bass side - 5/64"
Gibson acoustic specifications are:
- 1st fret- treble side- 1/64"
- 1st fret- bass side- 2/64"
- 12th fret - treble side- 5/64"
- 12th fret- bass side- 7/64"
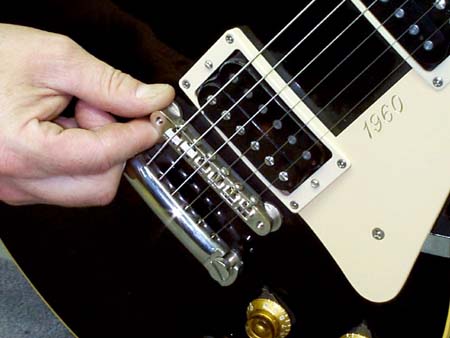
Adjust saddle height. On an electric guitar with a tune-o-matic bridge, or on an archtop guitar with a height-adjustable bridge, the thumbwheels will raise or lower the bridge. You may have to loosen the strings a bit to get the bridge to raise easily. On an acoustic, the bottom edge of the saddle will have to be shaved or sanded off to lower the action, or shimmed or replaced to raise the action. You'll have to loosen the strings to remove the saddle, then file it down on a flat file -- just a little at a time -- and then replace the saddle and tune up again. Don't try to file the top of the saddle, since it's rounded to match the radius of the fingerboard. And make sure the bottom remains flat or the bridge will want to rock in its slot and not make good contact with the top of the guitar.
If you are unable to bring the strings to a comfortable height for playing, you may need a neck set. Another option is to remove the bridge and either shave it down or replace it with a higher one. The optimum height for a wood bridge on a flat top guitar (just the bridge, not including the saddle) is 3/8", so if you're going to have to go much above or below that, the neck set is the better solution. Either way, it's a job for a pro.- To lower the nut slots, special nut files are required that are available from guitar shop supply sources. We get ours from Stewart-McDonald. Set nut slot depths to specs listed above for first fret.
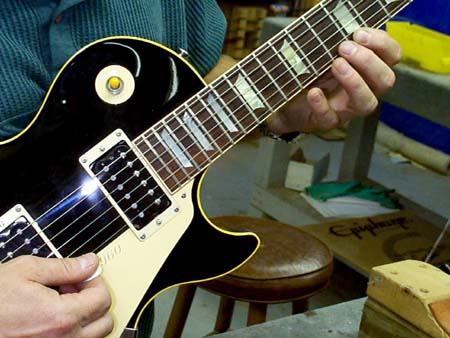
Check for fret buzz. Using a medium pick or light finger touch, check all fretted notes for string buzz. If correct, move up the next step. If not, some fret leveling may be required. This is another procedure for a pro with the right tools.- Check intonation. At the 12th fret, play a "chime tone" by touching the string without pressing it to the fret. Release your finger from the string as you pluck it. You should hear the octave overtone. Now press the string to the 12th fret and play. If the tones match, then the intonation is correct. Notice that the 12th fret tone may vary according to how hard you press the string down.
- Adjust intonation. On an electric guitar with a
tune-o-matic bridge, the length of each individual string is adjustable.
If the 12th fret tone is higher than the string's natural octave
overtone, then lengthen the string by moving the saddle toward the
tailpiece of the guitar. If the 12th fret tone is lower than the octave
overtone, then move the saddle toward the neck.
On an electric guitar with a wraparound tailpiece, the tailpiece can be adjusted only at the treble end and bass end. It is usually not possible to achieve perfect intonation for every string with a wraparound tailpiece. If an individual string is out of tune, you may be able to compensate by replacing that string with a higher or lower gauge string.
On an acoustic archtop guitar, you can only adjust string length by moving the entire bridge. Loosen the strings so that bridge will move freely without scratching the top of the guitar
On an acoustic guitar, the bridge can't be moved but it can be "intonated" so that the point where a string crosses the bridge is either forward or after the center of the saddle. In some cases, a thicker saddle is necessary to accomplish this. Intonating the saddle should be done by a professional and it can correct only minor intonation problems. Major intonation problems on acoustic guitars -- especially older models -- may be the result of an improperly placed saddle. In these cases, perfect intonation can only be achieved by re-routing the saddle slot or installing a new bridge and saddle. - Advice. If you want to attempt some of the more advanced setup and repair procedures, such as fret leveling, neck set or saddle replacement, first arm yourself with the proper instructional and proper tools, then try your hand on a junker guitar before you attack your favorite instrument.
Books and videos on guitar setup and repair:
- Stewart McDonald, www.stewmac.com
- Elderly Instruments, www.elderly.com
- JK Lutherie: www.jklutherie.com
- Wrench type 1/4" (for Gibson electrics and some acoustics), part #944, $4.98
- Wrench type 5/16" (for recent Gibson acoustics), part #946, $4.98
- T-bar nut driver, 1/4-inch, part #941, $13.45
No comments:
Post a Comment